•  

    Click HERE to join our forum and participate in the discussions.


New guy, new project: 1988 BII wheeler


leumas12

New member
Joined
Mar 13, 2008
Messages
161
Reaction score
0
Points
0
Location
San Jose, CA
Vehicle Year
1988
Vehicle
Ford
Engine Size
2.9L V6
the line locks were really easy. For the fronts i just separated the T at the frame, rerouted the line to the valve then back to the the T. For the rears I split the line at a coupler under the drivers door, up to the valve, and back. The valves are steel ball valves from mcmaster-carr and cost about $35 a piece. I used the 1/8"NPT inlet/outlets. They had an SAE 4 inlet outlet model but i dont think it had the inverted flare seat. As for brake line i just used kragens 3/16 line with 3/8-24 fittings on either end, with 3/8-24 inverted flare to 1/8"NPT adapters, also from Kragens. Whole deal cost me about $100, half that if you only do the front and a little less if you make your own brake lines rather than buying pre-made ones. Let me know if you have any other questions! I would be gald to supply pics if theres any more info you need :icon_thumby:

Thanks for the good words!

Sam


jaymegriffiths

New member
Article Contributor
Joined
Oct 19, 2008
Messages
0
Reaction score
0
Points
0
Location
Regina,Saskatchewan
Vehicle Year
1988
Vehicle
Ford
Engine Size
2.9
the line locks were really easy. For the fronts i just separated the T at the frame, rerouted the line to the valve then back to the the T. For the rears I split the line at a coupler under the drivers door, up to the valve, and back. The valves are steel ball valves from mcmaster-carr and cost about $35 a piece. I used the 1/8"NPT inlet/outlets. They had an SAE 4 inlet outlet model but i dont think it had the inverted flare seat. As for brake line i just used kragens 3/16 line with 3/8-24 fittings on either end, with 3/8-24 inverted flare to 1/8"NPT adapters, also from Kragens. Whole deal cost me about $100, half that if you only do the front and a little less if you make your own brake lines rather than buying pre-made ones. Let me know if you have any other questions! I would be gald to supply pics if theres any more info you need :icon_thumby:

Thanks for the good words!

Sam
im gonna do a little more research and maybe try my hand at it later, for now i need something to try out the new tools(socket set and rotary tool+pieces) with went shopping after gettin free parts from a wrecker so i felt obliged to spoil myself a little! haha but ya def. lookin into gettin some sort of line lock rigged...
 

leumas12

New member
Joined
Mar 13, 2008
Messages
161
Reaction score
0
Points
0
Location
San Jose, CA
Vehicle Year
1988
Vehicle
Ford
Engine Size
2.9L V6
Hey guys Ive finally gotten enough work done to justify an update haha. First things first: I got the door panels and “dashboard” built, painted, and installed. They are stainless steel painted with bedliner (I learned the hard way that you should always use a FOAM roller for bedliner, not cheap paint rollers. They kinda fall apart…) The dash is a frame of ¾” square tube and then skinned with stainless steel sheet. The switches that are on there now were in the original dash, just relocated obviously. Heres how they all came out:


And just today I finished up the bumper. Just a reminder the back and top of the bumper is a piece of 4x3/8” angle iron and the front face is 3/8” plate. The cutouts for the front winch bolts are pieces of the original front axle tie rod welded to the angle iron and the front plate then ground down smooth. It actually turned out really well, here are a few shots I got of it:


My little access holes for the front winch bolts, they fit a 9/16 socket perfectly.


Close but not too close


¼” steel rear mounts, scraps I had from some ruffstuff frame brackets


four ½” bolts per side, should hold on fine


I still need to paint it. Im thinking I will just use the rustoleum spray paint bedliner because its easy and I actually like it as far as texture. I will post pics of that too when its done.

Now im working on a new intermediate shaft for the doubler instead of the one thats welded. This time im gonna try out a little shear pin idea I got from a buddy. We’ll see how it turns out, I’ll post that up eventually. Thanks for looking!
 

88_Eddie

New member
Solid Axle Swap
Joined
Oct 1, 2009
Messages
0
Reaction score
5
Points
0
Location
Raleigh, NC
Vehicle Year
1988, 2000
Vehicle
Ford
Engine Size
2.9L, 4.0L
i'm gonna need you to delete this thread, you're makin mine look like girl....lmao....this thing is gonna be a beast, cant wait to see it finished
 

leumas12

New member
Joined
Mar 13, 2008
Messages
161
Reaction score
0
Points
0
Location
San Jose, CA
Vehicle Year
1988
Vehicle
Ford
Engine Size
2.9L V6
hahaha thanks man.

Havent been on in a long time, ive been busy with a new job and school but ive still been making progress!

The doubler is mounted and in which is really exciting. Also the bumper is painted. Made some drive flanges for the dana 60 too. I will get the pics up as soon as i can! Thanks for hanging around to see whats been going on! :icon_thumby:
 

leumas12

New member
Joined
Mar 13, 2008
Messages
161
Reaction score
0
Points
0
Location
San Jose, CA
Vehicle Year
1988
Vehicle
Ford
Engine Size
2.9L V6
The doubler is in! :yahoo: here are the pics of it mounted:

From the rear axle. The black tube is running into the cab to make filling it a little easier.


From the ground


¼” steel mounts welded to the original transmission crossmember. With the bushings at the frame, this setup should work good.


Side view, ground clearance is still great.


Still need shifters and driveshafts but those should be relatively easy. Im pretty stoked, we’ll see how it works out! :icon_bounceblue:

Sam
 

leumas12

New member
Joined
Mar 13, 2008
Messages
161
Reaction score
0
Points
0
Location
San Jose, CA
Vehicle Year
1988
Vehicle
Ford
Engine Size
2.9L V6
Got the driveshafts done yesterday. Nothing fancy, just some square tube ones. Larger tube is 2.5”x.25” wall and smaller is 2”. Yokes were from Driveshaft Superstore. I just used a 1/8” grinding/cutting wheel in my 4.5” angle grinder to grind the groove into the smaller tube for the weld seam. Need paint still but here are the pics of them welded and together:


Thanks for checking it out! :icon_thumby:

Sam
 

leumas12

New member
Joined
Mar 13, 2008
Messages
161
Reaction score
0
Points
0
Location
San Jose, CA
Vehicle Year
1988
Vehicle
Ford
Engine Size
2.9L V6
Hey guys. Just a small update here. I tried to reroute the exhaust using the original components and it didn’t work at all. Im pulling it back out and putting in a new small diameter muffler and upgrading to 2.5” pipe after the y connector. Pics of that when it happens

I also finished up the shifter. This was just a fun little project that I ended up really liking. Heres what I did:


But theres a surprise:


It works as a hand throttle when you grab the handle. It will come in handy when I need one foot on the clutch and one on the brake but need to rev up at the same time. Im stoked about it haha.

And here is a view of all the shifters (plus the brake handles are between the seats)


That’s it for now, thanks for looking :icon_thumby:
 

88_Eddie

New member
Solid Axle Swap
Joined
Oct 1, 2009
Messages
0
Reaction score
5
Points
0
Location
Raleigh, NC
Vehicle Year
1988, 2000
Vehicle
Ford
Engine Size
2.9L, 4.0L
are you gonna use the original y-pipe? i'm tryin to figure out the same exhaust situation you are (i think), i went and got a universal highflow cat from a website that has 2.5" openings at each end and i gotta figure out how to attach them. i'm thinking i'm just gonna weld a bunch of scrap metal pieces to it until it's all closed up lol
 

leumas12

New member
Joined
Mar 13, 2008
Messages
161
Reaction score
0
Points
0
Location
San Jose, CA
Vehicle Year
1988
Vehicle
Ford
Engine Size
2.9L V6
no im gonna switch out the y-pipe (doesnt have the correct angles for me and the outlet shape is weird) to one from summit that is 2" inlets and 2.5" outlet. I will have to add a bung for the O2 sensor but that shouldnt be an issue. im gonna buy a 6' roll of 2" flex pipe and another 6' of 2.5" flex pipe from kragens to connect it all and it will be good to go :cool: Also i dont have to worry about a cat since this thing is offroad only. Just a muffler which makes this whole thing easier.

Sam
 

88_Eddie

New member
Solid Axle Swap
Joined
Oct 1, 2009
Messages
0
Reaction score
5
Points
0
Location
Raleigh, NC
Vehicle Year
1988, 2000
Vehicle
Ford
Engine Size
2.9L, 4.0L
^
cool, i'll just check back when you post pics and maybe steal some of your ideas :icon_thumby:
 

leumas12

New member
Joined
Mar 13, 2008
Messages
161
Reaction score
0
Points
0
Location
San Jose, CA
Vehicle Year
1988
Vehicle
Ford
Engine Size
2.9L V6
haha sounds good, thats half the reason i post this stuff!
 

leumas12

New member
Joined
Mar 13, 2008
Messages
161
Reaction score
0
Points
0
Location
San Jose, CA
Vehicle Year
1988
Vehicle
Ford
Engine Size
2.9L V6
Well i have been working on the loose ends. I was having brake problems: even completely bled, the pedal would drop right to the floor. Fixed it by swapping in a master cylinder from a 76 Chevy Blazer. Worked well, pedal doesnt hit the floor now. It has a little bit large bore (1-1/8" rather than the stock .975"?). I still have quite a bit of pedal travel but i dont think its too much. If i decide i dont like it i will step up to a 1-1/4" bore from a '72 3/4 ton chevy pickup and that should be better. Chose the chevy master because the fittings were easy to adapt.

Also, the fluids are in. My doubler leaks, which isnt much of a surprise haha. Its leaking from between the steel adapter plate and the BW1350, right at the bottom. The best thing to do would be to pull it back apart and reseal it but thats alot of work and runs the risk of creating other leaks that are more difficult to get to. First thing im trying is just some JB water weld to seal it up. I drained the case last night and will be doing that tonight. I hope it works! If it still leaks a little bit im gonna leave it, i dont really care that much.

i SHOULD be taking a test drive this weekend. Im pretty excited, i will have someone record it and post it up for you guys if it happens
 

leumas12

New member
Joined
Mar 13, 2008
Messages
161
Reaction score
0
Points
0
Location
San Jose, CA
Vehicle Year
1988
Vehicle
Ford
Engine Size
2.9L V6
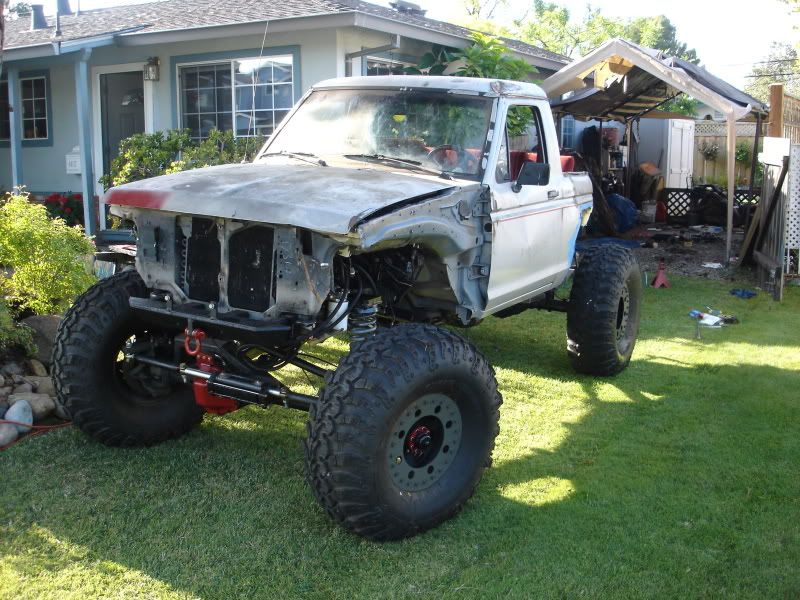
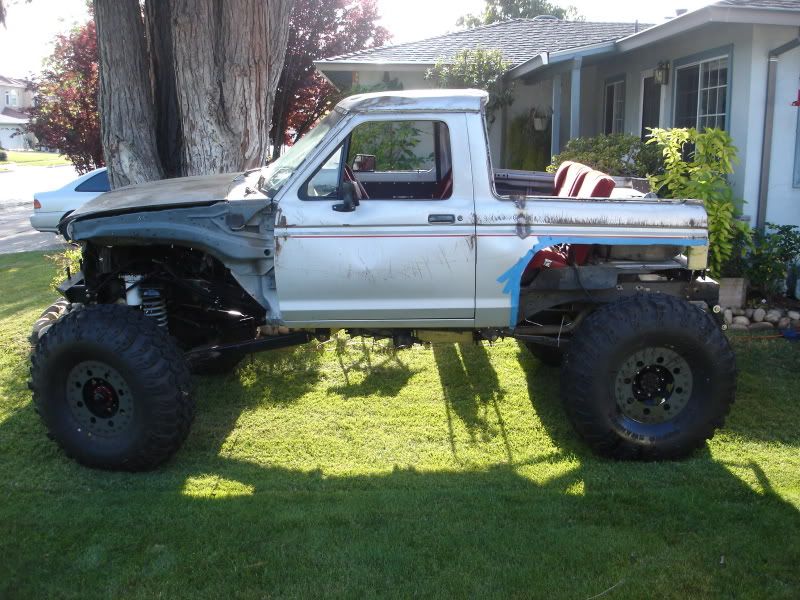
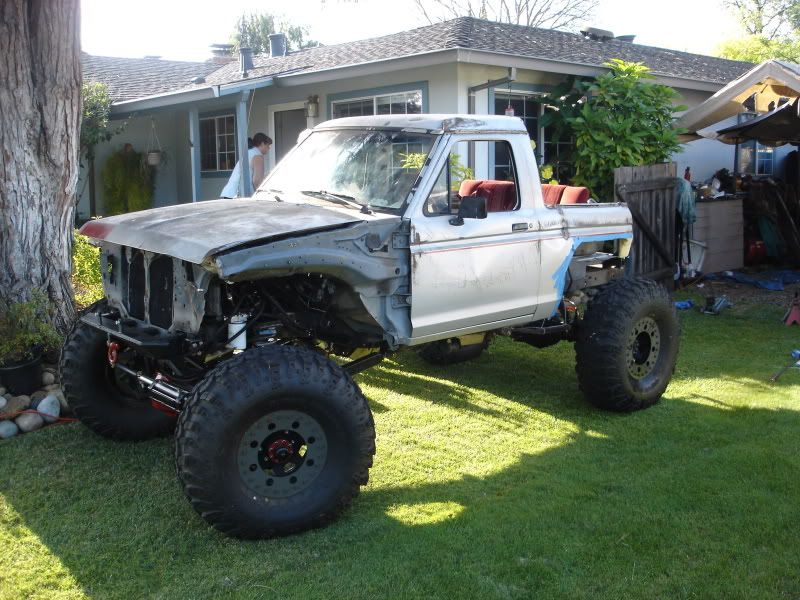
Well I got around to a test drive yesterday. Overall im pretty pleased. Heres what the truck looks like free from the side of the house:


And here are the results of the test drive:

PROS

-Doubler works perfectly (and thanks to JB Water Weld, doesn’t leak)
-tracks nice and straight down the road
-steering is effortless
-it stops on a dime (couldn’t test completely though, see the last CON)
-the ball valves as line locks work perfectly

CONS

-had difficulty getting the drivers side shaft in on the 14 bolt. Im thinking that welding the truss on brought it out of alignment. Im gonna try to straighten it out by cutting the truss on the top and shimming it with another thin piece of 2x2x.25” wall tubing.
-when in high range on the transfer cases, the engine can hardly get the truck going. Eventually I will get new gears for the axles, but for now I can just keep the D300 in low. Also, I could build myself a nice 302/np435 combo and call it good haha
-when steering, the pump whines
-if I try turning without revving the engine or I hit the limits I put in the cylinder, the engine usually dies
-when I slam the brakes, there was a really bad (and LOUD) grinding noise. Turns out that my driveshaft didn’t have enough clearance from my passenger side radius arm. When the suspension compressed from braking, it hit in a few places. Here are the pictures:


and this


which did this:


the heim and bolt are supposed to be perpendicular… The frame bent up about ½”. My weld held up just fine though. Also reminds me that I MUST box the frame haha.

Fixing the frame shouldn’t be hard, and figuring out how to give the driveshaft more clearance should be pretty easy. I do need to start searching for how to fix the steering though. I have a video of it driving that I will post up when I can. Thanks for checking it out guys!

Sam
 

leumas12

New member
Joined
Mar 13, 2008
Messages
161
Reaction score
0
Points
0
Location
San Jose, CA
Vehicle Year
1988
Vehicle
Ford
Engine Size
2.9L V6
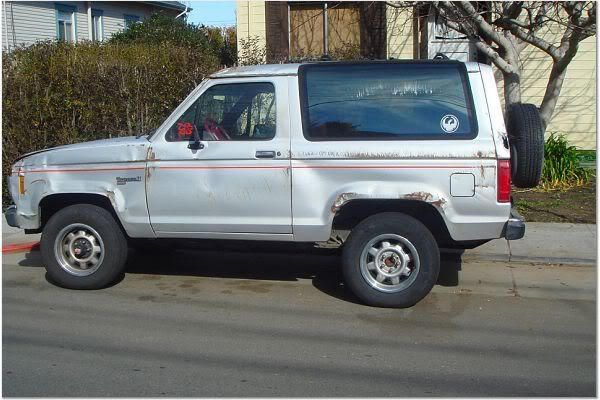
Just decided to post this up for fun :icon_thumby:

BEFORE


AFTER:


kris97ranger

New member
Joined
May 13, 2009
Messages
0
Reaction score
4
Points
0
Age
33
Location
lisle ontario
Vehicle Year
1997
2006
Vehicle
ford
Engine Size
4 litre and 4.2 litre
u putting the grill and fron fenders back on?
________
Web shows
 
Last edited:

leumas12

New member
Joined
Mar 13, 2008
Messages
161
Reaction score
0
Points
0
Location
San Jose, CA
Vehicle Year
1988
Vehicle
Ford
Engine Size
2.9L V6
u putting the grill and fron fenders back on?
No grill, it will be covered up by a winch and headlights. Fenders are a maybe, although there isnt much point since they'd probably be beat to hell anyway :D

Sam
 

ozziemo27

June 2010 OTOTM Winner
Joined
Oct 22, 2008
Messages
0
Reaction score
0
Points
0
Location
Michigan
Vehicle Year
1999/1984
Vehicle
Ford
Engine Size
4.0 & 2.3
I just read through your thread and theres only one way to describe it, Awesome! Just have patience and you'll get those bugs worked out in no time! Can't wait to see her out on the trails! :icon_thumby:
 

Top