
88ranger2.3
New member
- Joined
- Dec 11, 2008
- Messages
- 51
- Reaction score
- 0
- Points
- 0
- Location
- Southern Illinois
- Vehicle Year
- 1984
- Vehicle
- Ford
- Engine Size
- 2.8 soon to be 5.0
This was a pretty simple modification. I am sure someone probably posted about it, but I didn't see any under the search so I thought I would post mine.
Disclaimer
I won't take responsibility for any legalities that may come into play with this modification, or damages that may occur from the details I describe. Just use your head.
Description
Just a brief outline of what it takes to make a rear hatch removable.
Supplies/Tools Required
3/16" rod stock at least 12" (Welding rods make good material)
Bench Grinder (I used one, but it isn't really required.) or regular 4 1/2" Grinder
Cut off tool (Dremel or Die Grinders work nice, but a hack saw blade could be used)
2 small Cotter/Clip pins (I used hair pin clips)
Drill bit just larger then the Cotter/Clip pins
ViseGrip Pliers
Hammer
Drill
Directions
The first step is to go and find a piece of rod metal to replace the pins in the hinges. I used I believe a 3/16 inch stainless steel welding rod (just what I had around). I just used the bench grinder with a wire wheel to remove the shielding flux.
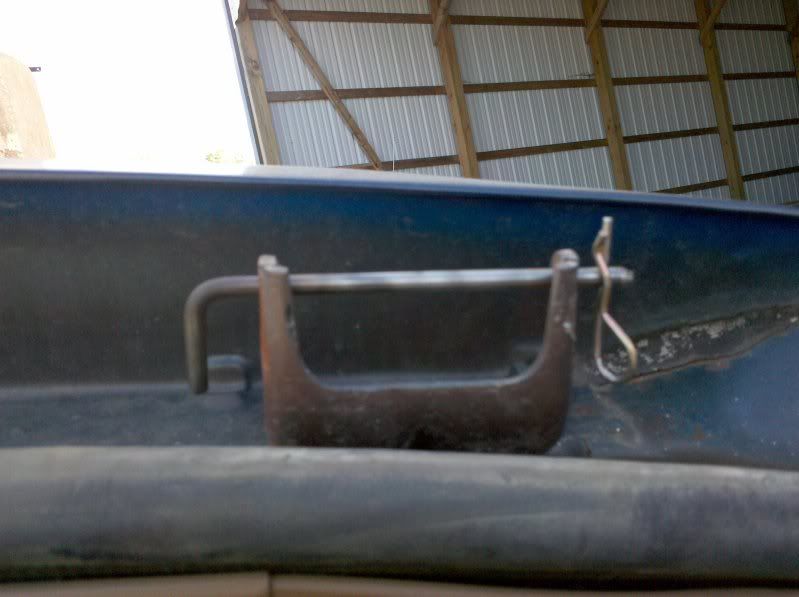
Next, I marked and cut off about 5". I used a small MAPP gas torch to heat and bend the rod to make a "L" shape (see picture below) where the short side is about 1" long and the long side is about 4" long.
Using the grinder make a taper to the long end of the pin approximately 1/4" long. (This makes installation easier)
Take the pin and carefully drill a cotter/clip pin hole close to start of the taper.
Now, using the cut off tool you have to cut the existing hinge pin off. I found it is easiest to use a small cut off wheel on a dremel or die grinder. I recommend cutting the pin in the center. Using the vise grips grab the pin tightly and hammer lightly on the side of the vise grips to move the half of a pin (halfpin from this point on) you grabbed out of the hinge. (remove the half closer to the center of the vehicle) Once you have moved the halfpin out a little you my have to reposition the vise grips to the outer edge of the halfpin and repeat the process to remove the halfpin fully.
Install the new pin into the half of the hinge and then remove the other half of the original hinge pin with the same process.
Fully install the hinge pin and install the retaining clip and you are half way done. Just repeat the steps to do the other hinge.
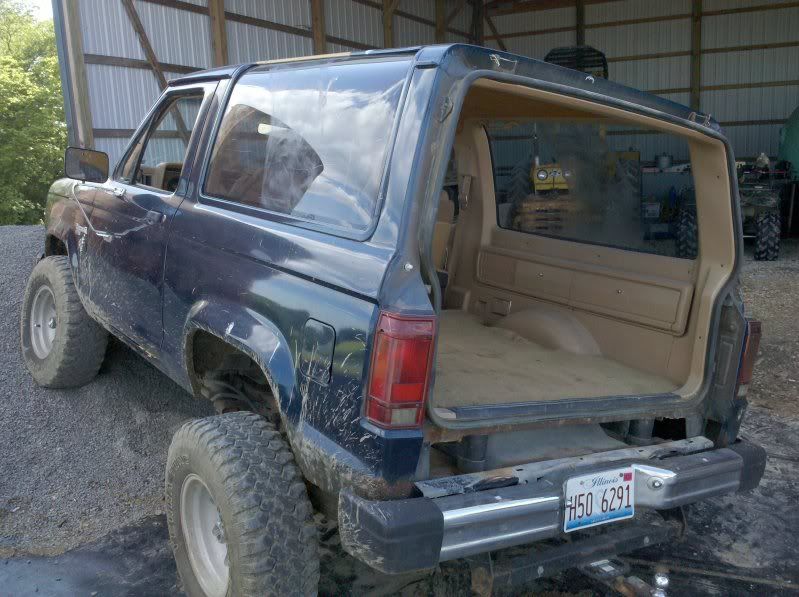
You now have a removable hatch.
Photos
Other Details/Concerns
The first thing to explain why this was a simple modification for me. My bronco is pretty basic with options. It doesn't have a rear wiper, defrost, third brake light... There is no wiring to or from the hatch I had to deal with so keep this in mind before you do the modification that you might have to deal with hooking and unhooking wires to remove/install your hatch.
Also, I found that I could remove a fuse for "interior lights" from the fuse box to keep the interior lights from staying on. Just a simple fix to be able to have the hatch off.
I hope this write up helps anyone curious about making their hatch removable and enjoy.
Disclaimer
I won't take responsibility for any legalities that may come into play with this modification, or damages that may occur from the details I describe. Just use your head.
Description
Just a brief outline of what it takes to make a rear hatch removable.
Supplies/Tools Required
3/16" rod stock at least 12" (Welding rods make good material)
Bench Grinder (I used one, but it isn't really required.) or regular 4 1/2" Grinder
Cut off tool (Dremel or Die Grinders work nice, but a hack saw blade could be used)
2 small Cotter/Clip pins (I used hair pin clips)
Drill bit just larger then the Cotter/Clip pins
ViseGrip Pliers
Hammer
Drill
Directions
The first step is to go and find a piece of rod metal to replace the pins in the hinges. I used I believe a 3/16 inch stainless steel welding rod (just what I had around). I just used the bench grinder with a wire wheel to remove the shielding flux.
Next, I marked and cut off about 5". I used a small MAPP gas torch to heat and bend the rod to make a "L" shape (see picture below) where the short side is about 1" long and the long side is about 4" long.
Using the grinder make a taper to the long end of the pin approximately 1/4" long. (This makes installation easier)
Take the pin and carefully drill a cotter/clip pin hole close to start of the taper.
Now, using the cut off tool you have to cut the existing hinge pin off. I found it is easiest to use a small cut off wheel on a dremel or die grinder. I recommend cutting the pin in the center. Using the vise grips grab the pin tightly and hammer lightly on the side of the vise grips to move the half of a pin (halfpin from this point on) you grabbed out of the hinge. (remove the half closer to the center of the vehicle) Once you have moved the halfpin out a little you my have to reposition the vise grips to the outer edge of the halfpin and repeat the process to remove the halfpin fully.
Install the new pin into the half of the hinge and then remove the other half of the original hinge pin with the same process.
Fully install the hinge pin and install the retaining clip and you are half way done. Just repeat the steps to do the other hinge.
You now have a removable hatch.
Photos
Other Details/Concerns
The first thing to explain why this was a simple modification for me. My bronco is pretty basic with options. It doesn't have a rear wiper, defrost, third brake light... There is no wiring to or from the hatch I had to deal with so keep this in mind before you do the modification that you might have to deal with hooking and unhooking wires to remove/install your hatch.
Also, I found that I could remove a fuse for "interior lights" from the fuse box to keep the interior lights from staying on. Just a simple fix to be able to have the hatch off.
I hope this write up helps anyone curious about making their hatch removable and enjoy.
Last edited: