
-
Click HERE to join our forum and participate in the discussions.
Lill Mule 89 BII
- Thread starter shawn.m
- Start date
shawn.m
New member
- Joined
- Feb 11, 2010
- Messages
- 166
- Reaction score
- 0
- Points
- 0
- Location
- 18 miles se of placerville,ca
- Vehicle Year
- 1989
- Vehicle
- Ford
- Engine Size
- 4.0
well I am down to only 3 wires past the dash in the cab.
needs to be running in two weeks for another snow run in the same area I was yesterday. Could be another narly run - it will depend on the temps
needs to be running in two weeks for another snow run in the same area I was yesterday. Could be another narly run - it will depend on the temps
shawn.m
New member
- Joined
- Feb 11, 2010
- Messages
- 166
- Reaction score
- 0
- Points
- 0
- Location
- 18 miles se of placerville,ca
- Vehicle Year
- 1989
- Vehicle
- Ford
- Engine Size
- 4.0
Ok front bumper is welded back on - a buddy let me have some stick time with his miller 200 mig. Got the bumper all welded up and cross braced. MUCH happier with how strong the welds are.
Man! what a great welder!
Thinking about moving the winch from the top of the bumper to behind the bumper and between the frame rails.
Going to play with cardboard tomorrow to see how I could do it.
Man! what a great welder!
Thinking about moving the winch from the top of the bumper to behind the bumper and between the frame rails.
Going to play with cardboard tomorrow to see how I could do it.
shawn.m
New member
- Joined
- Feb 11, 2010
- Messages
- 166
- Reaction score
- 0
- Points
- 0
- Location
- 18 miles se of placerville,ca
- Vehicle Year
- 1989
- Vehicle
- Ford
- Engine Size
- 4.0
Windshield glued back in
I also glued my windshield back in using 3M Tub and Glass adhesive. Windshield is stuck in their good. Pretty happy about it! now need to caulk a couple small holes in the roof.
Passenger side power window quit so I took the door panel off and wired the window shut. Much nicer to have both windows closed and the rear tarp. Much warmer!
shawn.m
New member
- Joined
- Feb 11, 2010
- Messages
- 166
- Reaction score
- 0
- Points
- 0
- Location
- 18 miles se of placerville,ca
- Vehicle Year
- 1989
- Vehicle
- Ford
- Engine Size
- 4.0
Start of OBA! on board air
bought a MV-50 12 v compressor this last week with some Amazon credits that I had. really good reviews on line for this compressor. It has really good reviews on the jeep websites.
http://www.amazon.com/Industries-MV50-SuperFlow-Hi-Compressor/dp/B000BM8RT8
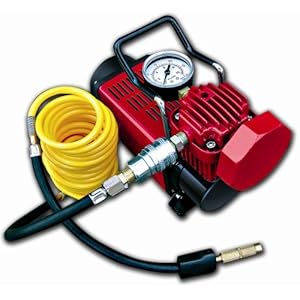
it lived up to expectations by airing up my 33s to 33 psi from 10 psi in under 3 minutes.
My extra coiled air hose with a universal female fitting plugged right now the fitting. This is the only thing on line that people talk about as bad. I put it under the hood in the battery box area to test fit it. Fits real good, so probably going to just bolt it to the battery box tray. Plus hard wire it to the battery.
I also bought some Tuff Stuff Tire Deflators.
http://www.amazon.com/Tuff-Stuff-Tire-Deflator/dp/B0049WPUX2/ref=sr_1_1?ie=UTF8&s=automotive&qid=1295803051&sr=1-1
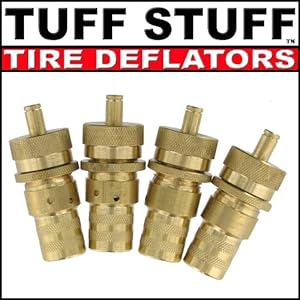
They were hard to adjust as the reviews said. What was not said was how slow they are! Takes almost 10 minutes to go down to my desired 10 psi. I can pull the stem and have the tire down to 10 psi in 2 minutes just doing it by hand. So I think that I will just go back to the Manual method.
bought a MV-50 12 v compressor this last week with some Amazon credits that I had. really good reviews on line for this compressor. It has really good reviews on the jeep websites.
http://www.amazon.com/Industries-MV50-SuperFlow-Hi-Compressor/dp/B000BM8RT8
it lived up to expectations by airing up my 33s to 33 psi from 10 psi in under 3 minutes.
My extra coiled air hose with a universal female fitting plugged right now the fitting. This is the only thing on line that people talk about as bad. I put it under the hood in the battery box area to test fit it. Fits real good, so probably going to just bolt it to the battery box tray. Plus hard wire it to the battery.
I also bought some Tuff Stuff Tire Deflators.
http://www.amazon.com/Tuff-Stuff-Tire-Deflator/dp/B0049WPUX2/ref=sr_1_1?ie=UTF8&s=automotive&qid=1295803051&sr=1-1
They were hard to adjust as the reviews said. What was not said was how slow they are! Takes almost 10 minutes to go down to my desired 10 psi. I can pull the stem and have the tire down to 10 psi in 2 minutes just doing it by hand. So I think that I will just go back to the Manual method.
shawn.m
New member
- Joined
- Feb 11, 2010
- Messages
- 166
- Reaction score
- 0
- Points
- 0
- Location
- 18 miles se of placerville,ca
- Vehicle Year
- 1989
- Vehicle
- Ford
- Engine Size
- 4.0
more bumper stuff
Worked on the winch plate and angle stiffeners today. Going to put 3/16 angle iron going back to the bolt mount for the sway bar. Bolt it there and put two bolts from the outside flat to the angle iron. Then the winch plate will be welded to the angle iron and to the bumper mounts and to the bumper. Going to weld another plate on the bottom front of the bumper to hold the rollers plus tie that plate to the angle iron come all the way to front of the bumper. I will take pictures tomorrow.
this will lower the winch and move it back between the frame rails. It will also let me move my tow hooks back on top of the bumper
Going to be very solid and not move!
Also my Bell tech 6400 shackles should be here tomorrow:icon_thumby: this will let me level off the bronco. Will be interesting to see how much more flex I get with the longer shackles. If I still hit my rear fenders they are getting wacked! :icon_welder:
shawn.m
New member
- Joined
- Feb 11, 2010
- Messages
- 166
- Reaction score
- 0
- Points
- 0
- Location
- 18 miles se of placerville,ca
- Vehicle Year
- 1989
- Vehicle
- Ford
- Engine Size
- 4.0
bumper welded up
ok got the bumper all welded up.
used 7018 rod which is a real pain to weld with. Going to have to grind off some of the welds and redo them to make them look nice.
Lots of cutting, grinding and welding went on today.
added 3/16 2 inch angle iron going back to sway bar mount
took the winch plate and cut it up so that it fits between the frame rails. It is welded to the bottom of the angle iron - I was going to weld it on top. I didn't like how the cable had a chance to hit the bumper. So I moved the winch plate to underneath the angle iron. which meant more grinding and cutting. I do like how compact it is going to be once it is all put together.
Only problem when I went to test fit the bumper back on is that it is REALLY tight. Looks like the Angle iron shifted out when I was welding it. Was really tired after all the cutting and grinding so will work on it more tomorrow.
I have to cut the hole in the new bracket for the winch cable. Also need to drill two holes to attach the roller fairhead. Looks like going to have to move the solenoids from the top of the winch to someplace else. I also have a 20 amp 3 pole switch that I want to put in the cab as a remote winch control.
So possibly Thursday I might be able to bolt it all together and re run the power cables. :icon_hornsup:


ok got the bumper all welded up.
used 7018 rod which is a real pain to weld with. Going to have to grind off some of the welds and redo them to make them look nice.
Lots of cutting, grinding and welding went on today.
added 3/16 2 inch angle iron going back to sway bar mount
took the winch plate and cut it up so that it fits between the frame rails. It is welded to the bottom of the angle iron - I was going to weld it on top. I didn't like how the cable had a chance to hit the bumper. So I moved the winch plate to underneath the angle iron. which meant more grinding and cutting. I do like how compact it is going to be once it is all put together.
Only problem when I went to test fit the bumper back on is that it is REALLY
tight. Looks like the Angle iron shifted out when I was welding it. Was really tired after all the cutting and grinding so will work on it more tomorrow. I have to cut the hole in the new bracket for the winch cable. Also need to drill two holes to attach the roller fairhead. Looks like going to have to move the solenoids from the top of the winch to someplace else. I also have a 20 amp 3 pole switch that I want to put in the cab as a remote winch control.
So possibly Thursday I might be able to bolt it all together and re run the power cables. :icon_hornsup:
shawn.m
New member
- Joined
- Feb 11, 2010
- Messages
- 166
- Reaction score
- 0
- Points
- 0
- Location
- 18 miles se of placerville,ca
- Vehicle Year
- 1989
- Vehicle
- Ford
- Engine Size
- 4.0
UPS finally delivered my Shackles. Will see if I have time to put them on tomorrow.
shawn.m
New member
- Joined
- Feb 11, 2010
- Messages
- 166
- Reaction score
- 0
- Points
- 0
- Location
- 18 miles se of placerville,ca
- Vehicle Year
- 1989
- Vehicle
- Ford
- Engine Size
- 4.0
bumper is on the bronco after some more welding and grinding of the welds.
Getting everything to bolt back up was a challenge!
Plus side is I don't think it will ever move again:icon_cheers:
Have the winch cable window cut into the front of the bumper and the roller fairhead on the bumper.
Next is to get the winch to fit into its try. Its REALLY tight- going to have to remove the grill and the bar under the grill to get it in.
Not sure if I will have time today to run my external wires to the switch in the cab for the winch. I have to leave tomorrow morning at 6am for a Search and Rescue training exercise in the snow. bunch of packing that needs to happen today. snow shows, extra clothes, food, tools, 24hr packback, sleeping bag, food, and make it all so it doesn't move:icon_thumby:
shawn.m
New member
- Joined
- Feb 11, 2010
- Messages
- 166
- Reaction score
- 0
- Points
- 0
- Location
- 18 miles se of placerville,ca
- Vehicle Year
- 1989
- Vehicle
- Ford
- Engine Size
- 4.0
had to remove grill and cut out center of the beauty bar under the grill.
had to move the winch control solinoids to the side of the winch instead of the top as it was hitting the grill. moved the power steering cooler a little higher to clear the winch.
Looks pretty good now!
got the lights back on and tested winch and everything works.
next project is to run wires to the cab for remote winch control.
have to see how it does in the snow tomorrow.
pics below
shawn.m
New member
- Joined
- Feb 11, 2010
- Messages
- 166
- Reaction score
- 0
- Points
- 0
- Location
- 18 miles se of placerville,ca
- Vehicle Year
- 1989
- Vehicle
- Ford
- Engine Size
- 4.0
Had a good snow run. Only got stuck once!
everything worked, winch worked good, air compressor worked good
I was at 11-12 psi and broke through the crust going up hill. shoveled a little bit. lowered my tire pressure to 6psi. backed up and got out of it. pretty darn happy with how my driving skills are getting better as I drive the mule more.
only a couple of pics -
once to show as I was pulling a guys Kubota RTV out you can see farther down the hill one of the team ended up completly sideways on the track. Also notice the depth of the snow with water running on both sides of the road.

2nd pic is to show what happens when you break through the crust on the snow- just powder underneath

everything worked, winch worked good, air compressor worked good
I was at 11-12 psi and broke through the crust going up hill. shoveled a little bit. lowered my tire pressure to 6psi. backed up and got out of it. pretty darn happy with how my driving skills are getting better as I drive the mule more.
only a couple of pics -
once to show as I was pulling a guys Kubota RTV out you can see farther down the hill one of the team ended up completly sideways on the track. Also notice the depth of the snow with water running on both sides of the road.
2nd pic is to show what happens when you break through the crust on the snow- just powder underneath
4x4b2
New member
- Joined
- Mar 14, 2010
- Messages
- 252
- Reaction score
- 0
- Points
- 0
- Location
- eastern oregon
- Vehicle Year
- 1986
- Vehicle
- ford
- Engine Size
- 2.9l v6
dude this is one sick bronco, im really starting to like 2nd gens, what ever happened to that toyota top for the rear?
shawn.m
New member
- Joined
- Feb 11, 2010
- Messages
- 166
- Reaction score
- 0
- Points
- 0
- Location
- 18 miles se of placerville,ca
- Vehicle Year
- 1989
- Vehicle
- Ford
- Engine Size
- 4.0
angles were all off. my wife expressed extreme opposition to it alsodude this is one sick bronco, im really starting to like 2nd gens, what ever happened to that toyota top for the rear?

that was why put the canvas top on it.
shawn.m
New member
- Joined
- Feb 11, 2010
- Messages
- 166
- Reaction score
- 0
- Points
- 0
- Location
- 18 miles se of placerville,ca
- Vehicle Year
- 1989
- Vehicle
- Ford
- Engine Size
- 4.0
belltech shackles mounted
ok got the belltech 6400 lift shackles installed. The body is now level as measured by my angle gauge.
No sweat at all. the leaves on the bronco have poly rear bushings as a side note.
Also re torqued the rear leaf spring mount bolts.
Cycled the suspension to make sure first that the rear shocks are long enough with the lift shackles. The shocks are about 1 inch longer than the lowest droop of the leaves:icon_thumby:
The pinion angle is still good also- pointed right at the rear of the transfer case- maybe a touch up right now. The drive shaft looks like it has plenty of travel also.
It is 12 inches from the top of the spring mount to the frame at full droop. at normal height it is 6.75 inches. Did some quick flexing and stuffed the rear wheels up. Got it to 3.5 inches from the frame with about 2 more inches before the tires hit the inside top of the rear fender wells. I will have to try stuffing it more tomorrow during light to see how much more space I have. After i undo the front sway bar and turn the rear shocks to 1 -loose-
Drove it around and it seemed more balanced. A touch more twitchy but not bad. The headlights work much better now that they are pointed at the road :icon_rofl:
shawn.m
New member
- Joined
- Feb 11, 2010
- Messages
- 166
- Reaction score
- 0
- Points
- 0
- Location
- 18 miles se of placerville,ca
- Vehicle Year
- 1989
- Vehicle
- Ford
- Engine Size
- 4.0
measuring for my sliders now. trying to decide on how to mount to the frame in the rear.
need help on this one.
Measured the front wheels - I am at .5 degrees negative /\ at the moment at rest in the garage. Need to get it to like .5 positive camber out \ / . Factory setting is 1- 2 degrees positive. Which I dont like. I would prefer 0 degrees.
Also about 1/4 3/8 toe out. So need to play with that.
- Joined
- Nov 7, 2009
- Messages
- 410
- Reaction score
- 4
- Points
- 0
- Location
- White Pine, TN
- Vehicle Year
- 1988/1989
- Vehicle
- Ford
- Engine Size
- 302/2.9
If I understand correctly, most shops make the front just a touch toe in for better handling, or something like that, of course I could be wrong and just dream't it.
Robert
Robert
shawn.m
New member
- Joined
- Feb 11, 2010
- Messages
- 166
- Reaction score
- 0
- Points
- 0
- Location
- 18 miles se of placerville,ca
- Vehicle Year
- 1989
- Vehicle
- Ford
- Engine Size
- 4.0
toe in and out are almost personal preference.
1/8 toe in keeps wandering down.
Toe out makes it easier to do turns as the outside wheel will be turning more
I prefer 0 toe in - it means that I have to be a bit more active driving but it doesn't wear the tires as much on my mountain roads. I had this done on my other vehicles
alignment is a bit tricky with a 6 inch lift - my suspension moves all over the place because of the springs. Will get really interesting when I put softer springs up front.
Last edited:
shawn.m
New member
- Joined
- Feb 11, 2010
- Messages
- 166
- Reaction score
- 0
- Points
- 0
- Location
- 18 miles se of placerville,ca
- Vehicle Year
- 1989
- Vehicle
- Ford
- Engine Size
- 4.0
alignment and snow run
so the alignment was pretty good. spent about a hour to get it almost 0 toe in and then more work to make it so that the steering wheel was straight down.
except after all that work it looks like the rear end is cocked a little bit. so it still pulls a little bit to the right
It runs easier down the road - I can coast longer than I used to. so I am close. Need to work a little bit more on the rear axle to see if I can get it straight.
did another snow run today. REALLY REALLY sucky snow. crust on top and then dry powder sugar snow underneath. As long as you were on top of the snow you were ok. break through and then it was shovel time. :icon_twisted::sad:
Even our most capable rig was breaking through the crust and having to winch constantly.
As we were airing down a guy asked us how far we were going in. Turned out he had stuck his stock 4 runner about 4 miles in the previous night. So gave him a ride in. He was pretty stuck and had broken a front hub also. We tugged him out and got him on his way.
We had to get around him first as the track was real narrow. As I was going around i got sucked into the powder. So I did my first winch out with the new bumper. With all the guys razzing me :icon_thumby:
No issues. might pull off the rear bumper and reweld that while I am thinking about it.
When we came out and were airing up, I had a minor issue. I unintentionally did the one thing that you cant do with the MV50 air pump. turn it off to check air pressure and then turn it back on. the pressure from the tire goes against the piston and the motor cant over power the pressure.
blew the fuse and then blew my spare when I forgot to pull the leads from the battery. guy behind me finished airing up my tires so I was ok.
also compared my normal air gauge with my new slime air gauge. turns out my good -$7 Milton - air guage is about 3 lbs high compared to my other gauge. checked it against my buddy's gauge and the Slime one was same as my buddies.
So that means that I was running at 11 psi instead of 8. I need to take a picture of how much the x-terrians bulge out - it is incredible
shawn.m
New member
- Joined
- Feb 11, 2010
- Messages
- 166
- Reaction score
- 0
- Points
- 0
- Location
- 18 miles se of placerville,ca
- Vehicle Year
- 1989
- Vehicle
- Ford
- Engine Size
- 4.0
On Board Air stuff
Picked up a cheap air compressor for $37 at Harbor freight parking lot sale, I got the last one in the store. This gives me the air tank, fittings, pressure gauge, pressure switch and a heavy duty power cord.
Thinking of mounting the MV50 under the hood by the air cleaner and battery. Maybe mount the tank in the back. Will have to play with it to see what I like. Good thing is that the compressor will be matched to the compressor. Might enable me to run a air rachet for getting tires off. Will also help for blasting tires back on.

http://www.harborfreight.com/1-3-hp-3-gallon-100-psi-oilless-air-compressor-97080.html
also bought the air compressor starter kit on sale for $12

http://www.harborfreight.com/20-piece-air-compressor-starter-kit-91860.html
Picked up a cheap air compressor for $37 at Harbor freight parking lot sale, I got the last one in the store. This gives me the air tank, fittings, pressure gauge, pressure switch and a heavy duty power cord.
Thinking of mounting the MV50 under the hood by the air cleaner and battery. Maybe mount the tank in the back. Will have to play with it to see what I like. Good thing is that the compressor will be matched to the compressor. Might enable me to run a air rachet for getting tires off. Will also help for blasting tires back on.
http://www.harborfreight.com/1-3-hp-3-gallon-100-psi-oilless-air-compressor-97080.html
also bought the air compressor starter kit on sale for $12
http://www.harborfreight.com/20-piece-air-compressor-starter-kit-91860.html
shawn.m
New member
- Joined
- Feb 11, 2010
- Messages
- 166
- Reaction score
- 0
- Points
- 0
- Location
- 18 miles se of placerville,ca
- Vehicle Year
- 1989
- Vehicle
- Ford
- Engine Size
- 4.0
Top
A buddy gave me a jeep soft top with brackets and tubing. it is not long enough but I might be able to extend the soft windows to the cab line pretty easy. The lines match up much better than the toyota truck topper that I was trying to use before.
maybe get pictures next week
A buddy gave me a jeep soft top with brackets and tubing. it is not long enough but I might be able to extend the soft windows to the cab line pretty easy. The lines match up much better than the toyota truck topper that I was trying to use before.
maybe get pictures next week