
Duraspark conversion for the Ford 2.8L V6.
The 2.8 carbureted V6, used in 1983-1985 Rangers, and 1984-1985 Bronco II’s, had a computer controlled feedback carb and a distributor that had its timing completely controlled by the computer. There is no mechanical advance in the distributor. Ford called this ignition system TFI (Thick Film Integrated). When functioning properly, this system delivers good performance and fuel economy. But when you factor in 20+ year old wiring and bad or missing components, poor mileage and power result. To rid yourself of this computer that constantly tries to adjust the timing and mixture, and often adjusts it wrong, you can convert to the standard electronic ignition and carb that was used on the 70’s 2.8L-powered Mustang II, Pinto, Bobcat, and Capri vehicles. This lets you set the tune of the engine, and it stays in that tune, instead of constantly varying as with the TFI system.
For 1983 and 1984 vehicles, this is a plug and play conversion.
For 1985 vehicles, there are some extra wires that need to be spliced together.
For 1985 vehicles with the A4LD Automatic overdrive transmission:
Get a GM switch (14014519) and connect it to the solenoid that goes to the lock up. In the line, also install a switch on the brake pedal that will break the circuit when the brake is applied. All you have to do is to drive normal and everything will operate as it did with the computer. I would not use a toggle switch. It seems like it would be a hassle trying to remember to cut it off and on while going down the road.
The switch was mounted on the firewall and connected to engine vacuum. The electrical was connected as follows: A hot wire to the solenoid, the other side of the solenoid and goes to one side of the vacuum switch. The other side of the vacuum switch goes to ground. So when the vacuum switch engages, it connects the circuit to the solenoid.
Now lets go back a little. The hot wire that I ran to the one side of the solenoid comes from a fuse that I installed form inside. It goes from the fuse to a second on/off switch that I mounded on the break pedal. So when I put on the brake, it opens the circuit.
Ford in England did the cars with the A4LD this way. The cars did not have the computer but used a vacuum switch that was made for Ford. These switches are very very hard to find. These cars were the England Granada’s , Merkur and a few others. They had the 2.8 with the A4LD. So you are not doing anything different than what Ford designed for those cars. Since I could not find a Ford vacuum switch, I used the GM switch. In fact, GM controlled their transmission lock up converters with this switch and a dual brake switch that open the circuit.
A4LD info courtesy of AlabamaRanger
*Note*
This is NOT considered smog legal. You may be able to remain smog legal by hooking up your EGR, air injection, and ECT, according to the way they were on a 70’s 2.8L. I make no guarantees to you that you will pass smog, or any other warranty or guarantee of your mechanical competence. If you mess up your rig, you’re on your own.
Parts list:
Distributor from a 79 2.8L Pinto. Ask for the non-Bosch style distributor. Single or dual diaphram works fine.
Canister style coil for a Duraspark vehicle or an Accell or MSD style canister coil.
New stock coil: ~ $20
New Accell or MSD coil: ~ $30
While you’re looking for the harness, grab the coil mounting bracket too. However, if you don’t, an aftermarket universal coil bracket will work.
Module to distributor/coil harness from a mid 70’s- mid 80’s Ford Duraspark equipped vehicle.
If you can’t find one, don’t worry. You can just make your own by using wire to connect to same color wires together on the distributor and module, and then run “Key-On” 12V power to the (+) side of the coil, and the green module wire to the (-) side of the coil.
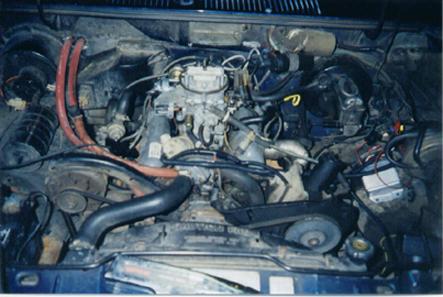
Carburetor: The 78 Pinto carb works well on stock engines. If your 2.8 is more performance oriented, or has headers and upgraded exhaust, you may want to use the 350CFM Holley 2V carb. This carb comes jetted for a V8 with ~#61 jets. A good jet size to start tuning a 2.8 with is #54 jets.
What about the stock feedback carb? Well, I ran it with everything unplugged for a while, but it ran too rich. Also, many have warped castings. I’ve run into several.
New Pinto carb: ~ $150
New 350 Holley: ~ $230
Ignition module: Either get a module from the junkyard, or get a new one for a 78 Pinto. Either way, you want to make sure the plastic grommet where the wires come out of the module is the “blue” colored one. New is about $20.
First, most people remove the computer and its associated wiring along with the solenoid bank on the passenger fender well.
The easiest way to start is to locate the temperature sender for the gauge or light, the oil pressure sensor wire, and the three alternator wires. Separate them from the computer harness, and remove the rest.
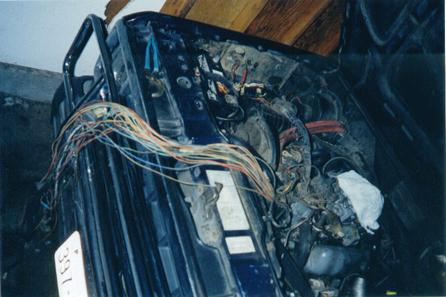
What, it’s that easy? Yes, it is. These wires run back to a large rectangular plug near the coil. There is also a 2-wire plug near the large rectangular plug that you will use to power the Duraspark module.
1983/1984 vehicle wires:

Use the wire from the rectangular plug that ran to the (+) (power) side of the stock coil to power the (+) side of your new canister Duraspark style coil. If you went and got the distributor/coil harness from a Duraspark-equipped vehicle in the junkyard, this is a plug in. If not, hook that wire to the (+) side of the coil, and the green wire from the module to the (-) side of the coil. I mounted my coil to the bottom wiper motor bolt using a ford coil bracket. Aftermarket brackets work after some bending.
Plug the 2-wire plug into the matching plug on the module. (Don’t worry – the red/lt blue wires will go to the white module wire, and the white plug wire will go to the red module wire. It’s fine.) The module bolts in place of the stock coil on the fender well, using the bolts that were used for the stock coil.
Plug the module’s distributor plug into the harness and plug that into the distributor. Plug your alternator wires and temperature/oil sensor wires back in and wrap them with some electrical tape. Reuse some of the old harness conduit, or use some new, smaller diameter conduit.
For the electric choke, run a wire from the stator terminal on the alternator to the electric choke. This is the way Ford did it on factory Duraspark rigs. This way, the choke only gets power when the engine is running, and it doesn’t open too quickly.
Set the base timing (I set mine to 12 deg), set the carb mixture, and enjoy your new better running ride.
When I did my 85 Bronco II, I went from black smoke and 12 MPG to good-running and 18 MPG.
Some hook the distributor’s vacuum advance up. I didn’t, and I’ve found that others who have done this have better power without the vacuum advance hooked up.
1985 vehicle wires:
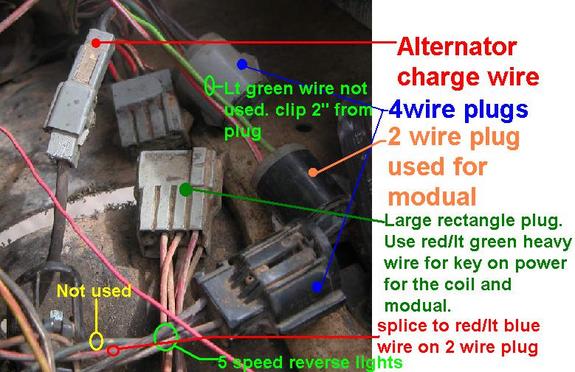
In the above picture, you can see that there is an additional 4 wire plug you have to deal with on 1985’s. The red/lt blue wire on the computer harness side (female side) of the plug needs to be spliced into the red/lt blue wire on the 2-wire plug. The dark blue wire on the 4-wire plug is not used. The other two wires on the 4-wire plug are for the reverse light switch for the 5-speed.
On the 2-wire plug, clip the lt green wire a couple inches back from the plug. Splice a wire from the heavy red/lt green wire to the light green wire and to the (+) side of the coil. On 1985 vehicles the heavy red/lt green wire is 12v “Key-On” power.
Author: Totalled
Tech Page written and edited by: Brian M. Rhoades (NightKrawler)