
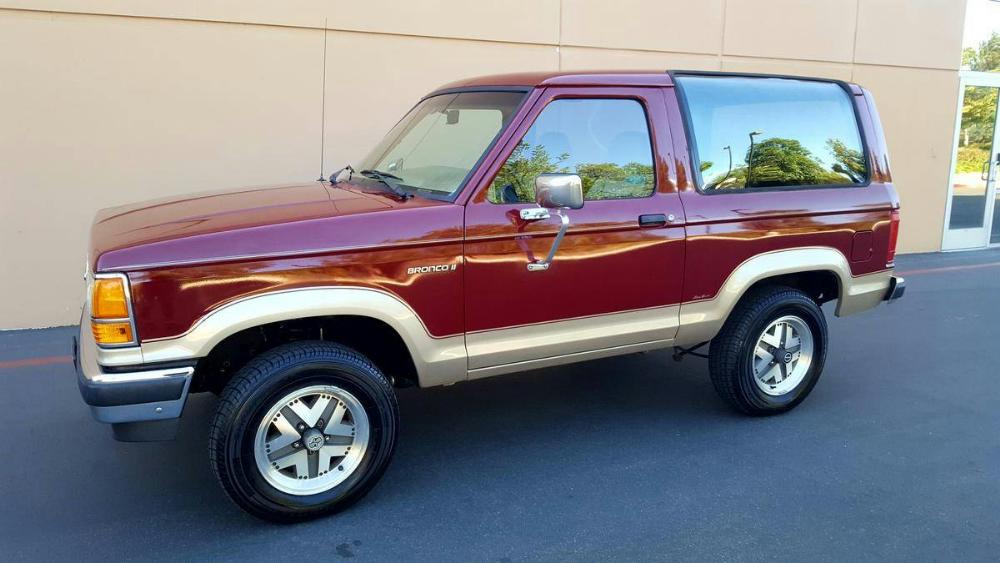
The Ford Bronco II was built from 1984-1990. Although it only had a 6-year run, there are still a lot of them left out there for sale. From time to time you can even find them in pretty great condition like the one shown above. Since you’ve came to this site to read this article, I am going to assume that you’re an off-road or adventure travel enthusiast, and will focus this article on that.
Mechanical Overview:
2.8L Engine: The 1984-1985 Ford Bronco II came with a 2.8L 115 Horsepower V6 Engine. This is a pretty simple engine that uses a carburetor, but the TFI module has been known to cause people problems. The purpose of a TFI module is to control the spark output of the ignition system. A signal is sent from the TFI to the ECU, where the ECU processes the received signal and correspondingly outputs the correct spark control for engine timing (advance/retard). Many people have eliminated the TFI by doing to a Duraspark Ignition Conversion. A unique feature about the 2.8L is that it uses a timing gear, instead of a timing chain that can stretch or break.
2.9 L Engine: The 1986-1990 Ford Bronco II came with a 2.9L 140 horsepower V6 engine. Unlike the earlier 2.8L, the 2.9L is fuel injected. The only real issue with these engines is that the cylinder heads were known to crack on the 1986-1988 models. The cylinder heads underwent a redesign for the 1989 model year, receiving additional material in problem areas, largely eliminating this specific failure. These head casts are commonly printed with the “89TM” designation. If you’re buying a 1986-1988 Ford Bronco II, you’ll want to check the engine oil for signs of engine coolant.
A4LD Automatic Transmission: The A4LD transmission used in the Ford Bronco II were known to fail. Often. Be aware that if you use this transmission off-road, it will not last very long.
C5 Automatic Transmission: The 1984 Bronco II came with a C5 automatic transmission. The C5 was a medium-duty, three-speed transmissions. The main difference between a C4 (not offered in the Bronco II) and a C5 was that the C5 had a lock-up clutch to improve gas mileage on the highway. The C4 was a case fill transmission with the dipstick in the case; the C5 employed a pan fill with the dipstick in the pan. This transmission is less prone to failure than the A4LD that replaced it. Some people have used the tailhousings and output shafts from the 4×4 version of this transmission in a C4 so they could do a V8 swap.
Manual Transmissions: The 4 & 5-speed transmissions used in these vehicles do not have any real problems, and will out last the automatics.
BW1350 & BW1354 Transfer Cases: The 1350 has a splined front receiver where the front driveshaft slides in. The 1354 has a yoke on the front that accepts a u-joint and holds it in place with straps. The BW1354 was only used in the Bronco II during the 1990 model year. The 1350 and 1354 are produced as a mechanical shift and electronic shift. These are both good transfer cases. Between the two, the BW1354 is the more desirable unit since it uses a front yoke and not the splined receiver. I have actually seen the front driveshaft slide out of a BW1350 after the front suspension dropped down to far while off-road, and pulled it out of the transfer case.
BW1359 “Dummy” Transfer Case: Almost all Ford Bronco II’s had 4WD transfer cases. Even the 2WD models. Why? Who knows. The BW1359 transfer case in the 2WD Bronco II’s was basically a ‘dummy’ case and had a permanent seal where the front driveshaft would go. This means that the two-wheel-drive Bronco II’s had 4WD transmissions. It’s strange considering the Ranger and Bronco II drivetrain was essentially the same. Why didn’t Bronco II’s have a Ranger 2WD transmission with a longer drivershaft? In 1990, the Bronco II’s final year of production, the 2WD Bronco II started showing up with a 2WD transmission. It used an adapters that slid on to the output shaft of a 2WD transmission and had a four bolt flange for the bolt on driveshaft. Since the 2WD Bronco II’s came with the 4WD transmissions, it makes converting a 2WD Bronco II to 4WD much easier.
Engine Swaps:
Ford 4.0L V6 Swap: The Ford 4.0L OHV out of a Ford Ranger or Ford Explorer has been a popular swap in Ford Bronco II’s. This engine produces 160 horsepower and ft-lbs of torque. If you swap in the engine, transmission, and harness from a 1995-1997 For Ranger, you will benefit from the stronger 4R55E automatic transmission.
Ford Rangers used the 60-wire EEC-IV computer thru 1994 (OBD-I). 1995 and up used the 104-wire EEC-V computers (OBD-II). The EEC-V computers (1995+) need a rear O2 sensor after the catalytic converter. So the added wiring is the reason you would look for a donor that uses EEC-IV (1990-1994) wiring and harness. It’s a simpler swap wiring-wise. The EEC-V is certainly doable, but only to 1997. After that you have PATS (passive anti-theft) to deal with, and speedometer issues.
The 1998-2000 4.0L Ford Rangers came with a 5R55E automatic transmission.
PATS started in 1998 in Ford Explorers and 1999 in V6 Rangers. All lost speedometer cable hook up by 1998, even on transfer cases.
For more information on 4.0L swap, vist the Tech Library.
Ford 302 / 5.0L V8 Swap: This is another swap that has been done on numerous occasions. These swaps typically involve either a Ford 302 with a carburetor, or a Ford 5.0L from a 1996-2001 Ford Explorer.
For information on wiring the 5.0l to your Ford Bronco II, check out “2.9L to 5.0L Engine Wiring“.
When using an automatic transmission and 4WD, you’ll need to get a new tailhousing and output shaft to adapt a Ford C4 or AOD to accept the Bronco II’s BW1350 transfer case, or get a C4 automatic from an early Ford Bronco 4×4 with a Dana 20 transfer case.
Ford more information on V8 swaps, visit the Tech Library at TheRangerStation.com
Suspension & Axles:
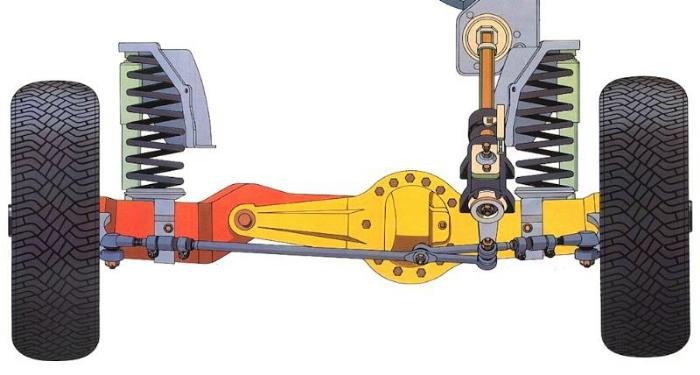
Twin Traction Beam (TTB) Front Suspension: The TTB is an independent front suspension in the sense that each side of the front vehicle has its own axle beam, coil spring, and radius arm. The TTB came as either a Dana 28 (1984-1989) or Dana 35 (1990). Both were reverse rotation differentials.
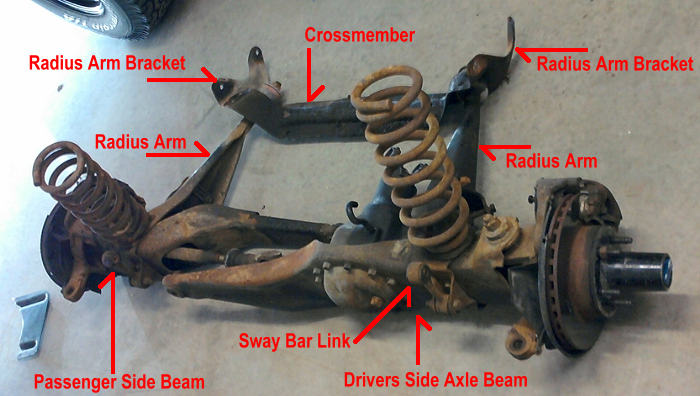
The photo below shows the 4WD Ranger front suspension, and the driver and passenger TTB axle beam. The end of the beam has a bushing in it, and bolts in to a suspension bracket on the trucks frame. This allows the axle beams to pivot independent of each other.
Dana 28 Axle: The Dana 28 had a small 6.625-inch diameter ring gear, and small 1.00-inch and 23-spline axle shafts. It also used small 456x u-joints. This axle was offered from 1984-1989. There are no longer any after parts available for this axle. Click HERE for more information on these axles.
Dana 35 Axle: The Dana 35 had a larger 7.56 inch diameter ring gear, and larger 1.16-inch and 27-spline axles shafts. This axle used larger 297x (stock), 760x u-joints. This axle was available for 1990 only. Click HERE for more information on these axles.
Ford 7.5-Inch Axle: All Ford Bronco II’s came with a Ford 7.5-Inch axle. (the name reflects the ring gear diameter)
Axle Upgrade / Swaps:
Dana 35 Front Axle: If you don’t have a 1990 Ford Bronco II with the Dana 35, then you should seriously consider upgrading your stock Dana 28 to this axle. The Dana 28 can really only handle a 31-inch tire, and the axle no longer has aftermarket support if you’re looking to re-gear it or add a locker. This axle is pretty strong, and shares the same u-joints as the Dana 44. The weak link is the flange style locking hubs, and I would strongly suggest that you upgrade to the Dana 35 Warn 37780 “Jeep” hub. These are a direct replacement for the Dana 35 Warn 29071 hubs. The Dana 35 is good for up to a 35-inch tire.
Dana 44 Front Axle: If you plan on going with a 36-inch or taller tire, you’ll need to switch to a larger axle. Many people have switched to an early Ford Bronco Dana 44. I’ve never been a big advocate of these swaps because these early Dana 44’s had small 260x u-joints. James Duff makes swapping one of these axles in to your Bronco II easier, but you may want to consider a stronger Dana 44 from a full size Ford truck.
Ford 8.8-Inch Rear Axle: The Ford 7.5-inch rear can handle a 33-inch tires. I’ve even seen them running 35’s, but I personally wouldn’t go that big. If you’re serious about building an off-road capable Ford Bronco II, you should swap out the Ford 7.5 rear axle for a 31-spline 8.8-inch axle. The Ford Ranger came with a 28-spline Ford 8.8-inch axle starting with the 1990 4.0L trucks. When the FX4 Ford Ranger was introduced in 2002, it came with the 31-spline 8.8-inch axle. The 1990-2001 Ford Explorers also came with the 31-spline 8.8-inch axles, and the 1995-2001 models came with disc brakes.
Suspensions Lifts, Body Lifts, and Fender Flares:
Suspension Lifts: A suspension lift will not only make room for larger tires, but it also moves the frame and drivetrain higher up from the ground. This will provide more ground clearance off-road. BUT, only tire size will affect how much room is between the axles and the ground.
Lifting your truck will affect its center of gravity. Ideally, you always want to keep your center of gravity as low as possible. A higher center of gravity will have a negative effect on how your truck handles, and increase the chance of a rollover when you’re navigating steep angles.
Body Lift: A body lift is a 2-inch or 3-inch spacer (3-inch is most common) that is bolted between the frame, and the body mounts. This will lift the body and make room for larger tires. It’s much cheaper than a suspension lift, and doesn’t increase your center of gravity as much as a suspension lift would, since the frame and drivetrain have not been raised.
Cut Fenders / Fender Flares: Another method of increasing tire size is by cutting the fenders and increasing the size of the wheel openings. Some people bolt on fender flares designed to cover the cut out openings (and cover the wider tires you’ll be adding), and some use a trim material along the edges of the cut to clean up the look, and protect from the sharp edges. Some cut the fenders and don’t use a flare at all.
Some people use a combination of suspension lift, body lift, AND cut fenders.
Choosing A Suspension Lift:
There are only (2) manufacturers that I would recommend when it comes to lifting your Ford Bronco II:
Skyjacker: Skyjacker offers 4 & 6 inch Class I and Class II kits. The Class II kits come with longer radius arms which not only allow 30% more wheel articulation (wheel travel), but also help to improve the ride.
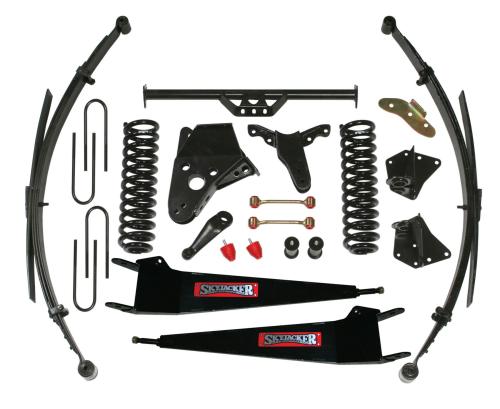
Link: www.skyjacker.com
James Duff: James Duff offers a 3-inch Stage one kit, and a 5-6 inch Stage 3 kit. The sage 3 kit comes with longer radius arms for improved wheel articulation (wheel travel)
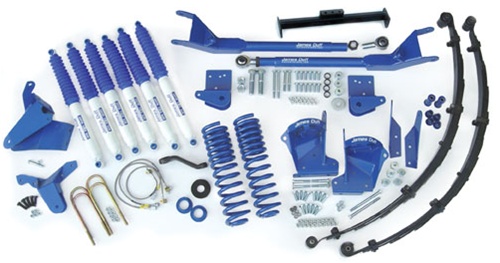
Link: www.dufftuff.com
Beware of Suspension Drop Brackets:
This is one of those topics that I think is overlooked and needs mentioning. People will buy a cheap lift kit to save money, or piece together their own lift with used parts. I strongly suggest you stay away from lift kits or suspension brackets that use a drop plate for the passenger beam pivot bracket.
Here’s why:
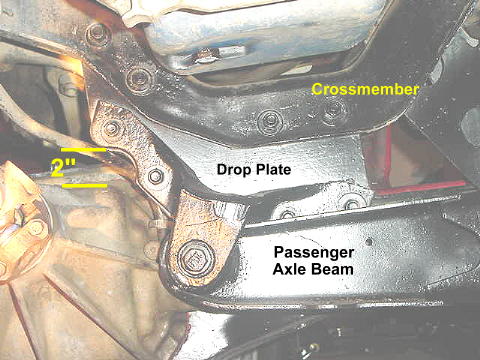
Looking at the back side of this lift, you can see where the pivot bracket for the passenger side beam has been lowered by using a drop plate. If you look to the left, you can see where there is only 2-inches of space between the bracket and the front differential. There is a risk that upward suspension travel could cause the differential to strike the plate and bracket and break the differential housing.

The photo above shows lift kit brackets that use the drop plate method. The photo below shows heavy duty brackets that includes a complete replacement passenger beam pivot bracket.
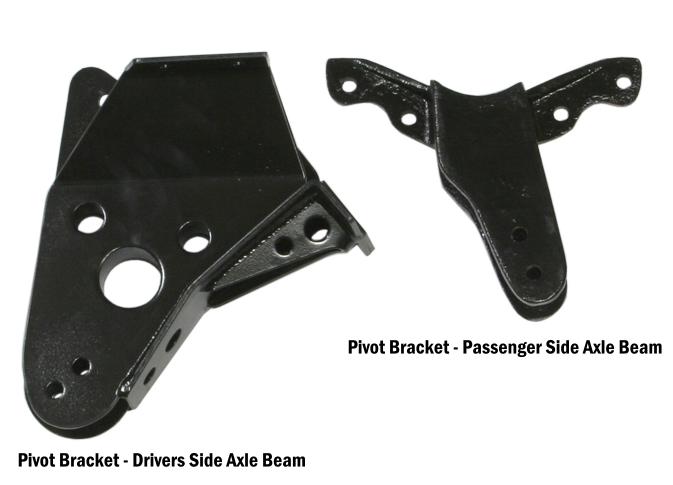
It’s because of these brackets, that I only recommend the Skyjacker or James Duff kits for your Ford Bronco II.
Other Links:
Some other pages you may find helpful are:
Ford Bronco II Common Upgrades
Photos:
Here are some photos to inspire you – Click the images to enlarge – Click the arrows to load more.


