
Intake & Cylinder Head Removal
1) Degrease engine compartment & engine before removal
2) Engine must be cold before starting job
3) Place transmission in neutral, apply parking brake
4) Disconnect battery & remove from vehicle, starting with ground cable first
5) Drain coolant from engine
6) Cover fenders for protection
7) Begin by marking plug wires with tape and location numbers, remove distributor cap with wires
8) Spray penetrating oil on threads and/or seam of head and manifold near exhaust bolts
9) Wear safety glasses, Release fuel pressure by pressing the shrater valve located on the fuel rail (lower intake manifold, driver’s side – Looks similar to a tire valve).
10) Remove dipstick
11) Remove left and right hand engine lifting brackets (if equipped)
12) Remove PCV valve and hoses from valve covers
13) Disconnect brake booster vacuum hose
14) Disconnect Throttle cable cover and cables from upper intake manifold (fold out of way towards driver’s side).
15) Disconnect all vacuum hoses from intake manifold
16) Disconnect A/C hose bracket from back of upper intake manifold
17) Disconnect all sensor plug wires from upper intake manifold
18) Remove air cleaner inlet hose entering upper intake manifold
19) Disconnect ground wires to upper intake manifold and back of heads
20) Remove upper radiator hose completely and heater hoses from engine
21) Break loose and remove fan / clutch (left hand thread on large hex)
22) Disconnect A/C compressor from brackets (pull to passenger’s side and place in battery’s location carefully moving hoses).
23) Remove A/C brackets including aluminum one to head
24) Remove alternator and bracket
25) Power steering pump and bracket can stay but remove belt
26) Remove spark plugs
27) Using large socket set engine to #1 cylinder to TDC timing mark and verify with distributor rotor pointing to #1 plug wire post.
28) Unplug remainder of wiring harnesses as needed
29) Remove upper intake manifold (reverse torque *6 bolts)
30) Remove valve cover bolts and load-spreading washers (take note of the load spreading washer positions for reinstallation *8 bolts per valve cover)
31) Tap valve cover with a rubber mallet to break gasket seal (do not pry apart)
32) Remove rocker arm shafts (reverse torque *3 bolts each)
33) Remove push rods (Take note of push rod locations , they must be returned to exact locations)
34) Remove exhaust manifold bolts (take note of each bolt’s length for installation *6 bolts each) A 2 FT. extension and swivel makes it easy to reach some bolts thru the wheel well
35) Remove distributor, noting location of rotor as it leaves block engagement
36) Remove lower intake manifold (reverse torque *8 bolts)
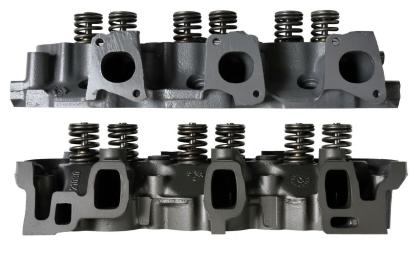
37) Remove heads (reverse torque *8 bolts each T55 Torx socket
2.9L V6 Head Installation (Have heads checked and completed before installation)
1) Clean all traces of gaskets and sealant from valve covers, cylinder heads, upper & lower intake manifold and engine block with gasket scraper and acetone or lacquer thinner.
2) Use vacuum cleaner to remove debris out of engine cylinders.
3) Use a tap to chase the threads in the heads, upper & lower intake manifold, exhaust manifold and rocker arm bolt holes.
4) Clean threads on all bolts with a dyes or wire brush
5) Place cylinder head gaskets in position on cylinder block.
NOTE: Gaskets are marked with the words “front” and “top” for correct positioning. Left and right cylinder head gaskets are not interchangeable.
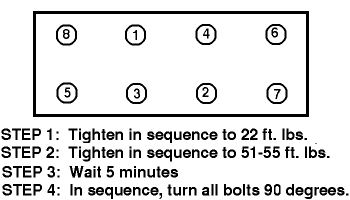
6) Install fabricated alignment dowels in cylinder block. Install cylinder head assemblies on cylinder block, one at a time.
NOTE: Use new cylinder head attaching bolts and torque to specification, as shown above.
7) Install all spark plugs except #1 cylinder
2.9L V6 lower intake manifold installation
Install intake studs to block (if they were removed) with double nuts (10 to 15 ft. lbs.) Apply a dab of black “high temp” silicone to the corners on block to heads and on the gasket to lower intake manifold making sure not to disturb gasket once applied or move lower intake manifold fore-&-aft after it contacts block.
Apply black silicone to bolt heads and stud nuts, finger tight Tighten in five stages following torque specs.
Step 1. 3-6 ft. lbs.
Step 2. 6-11 ft. lbs.
Step 3. 11-15 ft. lbs.
Step 4. 15-18 ft. lbs.
Step 5. After engine has been run repeat step 4 in sequence
Plug lower intake manifold ports with paper towels to keep parts from falling in Install new “O” ring seal on distributor, check to see if timing marks haven’t moved on the crank pulley Install distributor so rotor ends up pointing to #1 plug wire post on distributor cap.
2.9L V6 Rocker Arm Shaft Installation
Coat both ends of push rods with assembly lube or engine oil. Install push rods into their original places
Check rocker arm shaft for notch on end making sure it faces down. Loosen rocker arm adjusting screws several turns to ensure valve springs won’t be compressed after shaft is installed. Install rocker arm shaft. Torque rocker arm shafts in 180-degree turns (43-50 ft. lbs.)
2.9L V6 Valve Lash Adjustment
1) Remove spark plugs to allow easy turning of crankshaft To adjust both valves for each cylinder do cylinders one at a time in firing order. If the crankshaft did not move and is at Top Dead Center at #1 cylinder timing mark, adjust intake and exhaust valves of # one cylinder 1-1/2 or 1-3/4 turns tighter after 0 lash (no gap between rocker arm and end of valve) is achieved.
2) Use a 3/4″ socket on crank, turn crank clockwise only (because you can jump the timing chain if you turn the crank the opposite way), until cylinder #4 intake valve (next cylinder In firing order), is a smidgen past closing. Adjust intake and exhaust valves at this time the same way as previously.
3) I like using a “T Handle” on rocker arm nut to keep track of revolutions easier.
4) Continue through firing order 1,4,2,5,3,6, until you did all 6 cylinders.
5) Set engine crank at Top Dead Center at #1 cylinder timing mark.
6) Install and torque spark plugs
2.9L V6 Valve Cover Installation
1) If needed, trim valve cover gaskets for a great fit (out side of screw holes to have holes centered)
2) Apply a thin layer of black silicone to valve cover side only, apply gasket to valve cover
3) Apply a dab of silicone to the gasket space between the cylinder Head and the lower intake manifold Before setting valve covers in place
4) Install load spreading washers in correct locations and finger tighten screws (Torque screws to 36-60 in. lbs.)
5) Install distributor cap and wires, plug wire harnesses back in as required, install fuel lines,
6) Install alternator and belt; install A/C bracket, compressor and belts of A/C and power steering
7) Install radiator and heater hoses, and ground wires to head
Upper intake manifold installation
1) Apply gasket dry, finger tighten bolts (*6 bolts)
2) Tighten in two stages:
1) 7 ft. lbs.
2) 15-18 ft. lbs.
3) Install wires to upper intake manifold
4) Install all vacuum hoses
5) Install throttle cables and cover
6) Install hoses of brake booster, air intake, PCV valve and hoses
7) Install fan / clutch ( L.H. thread)
2.9L V6 Exhaust Manifold Installation
1) Exhaust manifold can be installed with or without new gaskets
2) Install exhaust manifold bolts finger tight
3) Torque exhaust manifold bolts 20-30 ft. lbs.
2.9L V6 Distributor And Cap Installation

1) With plug out of #1 cylinder turn crank until you feel air blowing out. STOP- this should be top dead center (TDC) on timing mark.
2) Put rotor facing #1 position in distributor cap.
3) Install distributor so that when it turns in, it will fall with #1 cylinder to the back left of engine block, leave attaching screw loose.
4) Install cap and wires.
5) Install #1 spark plug.
6) Plug wiring harnesses back in as required.
7) Install fuel lines.
8) Install alternator and belts.
9) Install A/C Bracket.
10) Pull A/C compressor back to bracket and install with belt.
11) Install belt on power steering.
12) Install dipstick tube and left engine lifting bracket (If so equipped).
13) Install heater hoses.
14) Install ground wires to back of block.
Engine Timing
1) Refill engine/radiator with coolant mixture
2) Install battery (Positive cable first)
3) Before starting, prime fuel lines by turning the key to the “on” position for 5 seconds
4) Repeat and start engine
5) Run until warm
6) Remove computer plug (spout) in wiring harness at the base of upper intake manifold on passenger side of vehicle
7) Use timing light (10 degrees on timing mark)
8) Secure distributor bolt
9) Shut off engine and plug computer spout back in
10) Check all fluids (radiator when cooled down)
11) Drive until engine is hot then re-torque lower intake manifold