
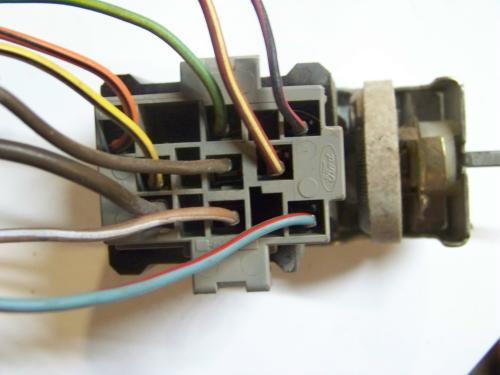
Ever needed to know what each of these wires are for?
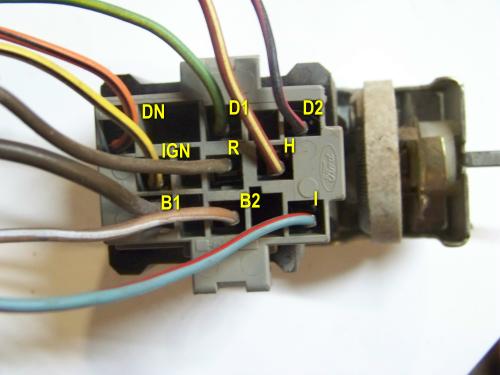
(Note: ‘H’ looks brown and yellow, but is actually red and yellow)
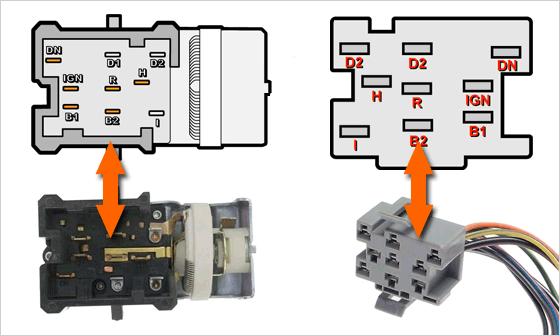
Here’s a description of all of the headlight pins:
|
Headlight Switch & Connector Pin Out |
||
| Pin | Wire Color | Description |
| B1 | Black with orange stripe | Battery (+) |
| B2 | Lt Brown (tan) with white stripe | Battery (+) |
| D1 | Green with yellow stripe | Power (+) for interior lamps |
| D2 | Black with violet (pink) stripe | To all interior lamps |
| H | Red with yellow stripe | To headlight dimmer switch |
| I | Blue with red stripe | To instrument panel lamps |
| IGN | Yellow with black stripe | Battery (+) |
| R | Brown | To exterior lamps |
| DN | Orange with black stripe | To radio illumination lamps |
Testing Procedures:
NOTE: The colors of the wires (above) may not be the ones coming out of the headlight switch connector in your particular Ford vehicle… but the circuit (pin) descriptions will be the same.
Testing the headlight switch simply involves testing the continuity of certain circuits.
To be a bit more specific… you’ll be using a multimeter in Ohms (Ω) and probing between two terminals (on the headlight switch itself) to see if there’s continuity between them.
If there’s no continuity between them, then that circuit is bad and the headlight switch has to be replaced.
NOTE: You’ll need to remove the headlight switch to test it.
The two pins that complete the circuit for the headlights are:
- pin B1
- pin H
The two pins that complete the circuit for the park lamp are:
- pin B2
- pin R
Start Here: Testing the Headlight Switch
Depending on what issue you’re having with your head lights (no headlights or no park lamps)… you’ll start in a different test.
NOTE: Before starting any of the tests below, take a look at this section: Melted Ford Headlight Switch Connector.
No Headlights
1. The first test involves jumping pins B1 and H and checking that the headlights turn on.
For this test, go to: TEST 1: Jumping the Headlight Circuit.
2. The second test involves checking the continuity between pins B1 and H of the headlight switch itself.
For this test, go to: TEST 2: Testing the Continuity of the Headlight Circuit.
No Park Lamps
1. The first test involves jumping pins B2 and R and checking that the headlights turn on.
For this test, go to: TEST 3: Jumping the Park Lamp Circuit.
2. The second test involves checking the continuity between pins B2 and R of the headlight switch itself.
For this test, go to: TEST 4: Testing the Continuity of the Park Lamp Circuit.
TEST 1: Jumping the Headlight Circuit
This test checks to see if the headlights come on when you jump terminals B1 and H of the headlight switch connector.
If the headlights come, then you can rule out any electrical problem between the headlight switch connector and the headlights.
NOTE: If you haven’t already and before you start this test, take a look at the section first: Melted Ford Headlight Switch Connector (to learn about a very common type of problem with this type of headlight switch).
OK, this is what you need to do:
1 Using a jumper wire, jump terminals B1 and H. Use the images above to locate the correct terminals.
2 The headlights should come on as soon as you complete jumping the two terminals of the headlight switch’s connector.
NOTE: If the headlights don’t turn on, turn the key to the On position. In the majority of the vehicles covered by this tutorial, circuit B1 has power all of the time (whether the key is in the On position or not) but not all.
CASE 1: The headlights turned on. This test result also tells you that:
1. That circuit B1 is getting power (12 volts).
2. That circuit H and everything in between the headlight switch connector and the headlight connectors (like the dimmer switch) are feeding power (12 volts) to the headlights.
The next step is to test the continuity between pins B1 and H of the headlight switch itself. Go to: TEST 2: Testing the Continuity of the Headlight Circuit.
CASE 2: The headlights DID NOT turn on. Recheck your jumper wire connections and retest.
If after double-checking your connections and retesting… the headlights still don’t turn on, then you’ve eliminated the headlight switch as the cause of the problem. You’ll need to:
1. Check that circuit B1 has power (12 volts).
2. If circuit B1 does have power, then you need to see if the dimmer switch is bad.
Although testing the above is beyond the scope of this tutorial, you have at least eliminated the headlight switch as bad and know what direction your troubleshooting needs to take.
TEST 2: Testing the Continuity of the Headlight Circuit
If you’ve reached this point, you’ve already verified that the headlights do turn on when jumping the correct headlight switch terminal connectors (TEST 1).
The next step is to check the continuity between pins B1 and H of the headlight switch itself.
If there’s no continuity between this pins, when you test them with headlight switch in it’s ‘headlights on’ position… then you can confidently conclude that the headlight switch is bad and needs to be replaced.
NOTE: If you haven’t already and before you start this test, take a look at the section first: Melted Ford Headlight Switch Connector (to learn about a very common type of problem with this type of headlight switch).
OK, this is what you need to do:
1 Place your multimeter in Ohms mode and pull the headlight switch knob to the ‘headlights on’ position.
2 Test for continuity between pins B1 and H. If all is ok, your multimeter should register continuity. This means any resistance value below 5 ohms or less.
3 Push the knob back in to it’s ‘headlight’s off’ position. Your multimeter should now show NO continuity. This is usually represented on the multimeter’s screen by the letters OL.
Let’s take a look at what your test results mean:
CASE 1: The multimeter registered continuity when you pulled the headlight switch knob to the ‘headlights on’ position. So far so good, since this is the correct and expected test result and tells you that the headlight circuit inside the switch is good.
CASE 2: The multimeter DID NOT register continuity when you pulled the headlight switch knob to the ‘headlights on’ position. Recheck your multimeter connections and retest.
If after double-checking your connections and retesting… the headlight switch still doesn’t show continuity between pins B1 and H, you can confidently assume that the headlight switch is bad and needs to be replaced (even more so if in TEST 1 the headlights came on when you jumped the headlight switch connector).
TEST 3: Jumping the Park Lamp Circuit
The very first thing we’ll do, to troubleshoot the ‘no park lamps’ issue on your Ford pick up (van or SUV) is to bypass the headlight switch and jumping terminals B2 and R of the headlight switch connector (using a jumper wire).
If the park lamps come on, then we can rule out any electrical problem between the headlight switch connector and the head lamps around your truck.
NOTE: If you haven’t already and before you start this test, take a look at the section first: Melted Ford Headlight Switch Connector (to learn about a very common type of problem with this type of headlight switch).
OK, this is what you need to do:
1 Using a jumper wire, jumper terminals B2 and R. Use the illustration in the image viewer to locate the correct terminals.
2 The park lamps should come on as soon as you complete jumping the two terminals of the headlight switch’s connector.
NOTE: If the park lamps don’t turn on, turn the key to the On position. In the majority of the vehicles covered by this tutorial, circuit B2 has power all of the time (whether the key is in the On position or not) but not all.
CASE 1: The park lamps turned on. So far so good, since this is the correct and expected test result. This test result also tells you that:
1. That circuit B2 is getting power (12 volts).
2. That circuit R and everything in between the headlight switch connector and the park lamp connectors are feeding power (12 volts) to the park lamps.
The next step is to test the continuity between pins B2 and R of the headlight switch itself. Go to: TEST 4: Testing the Continuity of the Park Lamp Circuit.
CASE 2: The park lamps DID NOT turn on. Recheck your jumper wire connections and retest.
If after double-checking your connections and retesting… the park lamps still don’t turn on, then you’ve eliminated the headlight switch as the cause of the problem. You’ll need to:
1. Check that circuit B2 has power (12 volts).
2. If circuit B2 does have power, then you’ll to check for an electrical open between circuit R and the park lamps.
Although testing the above is beyond the scope of this tutorial, you have at least eliminated the headlight switch as bad and know what direction your troubleshooting needs to take.
TEST 4: Testing the Continuity of the Park Lamp Circuit
If you’ve reached this point, you’ve already verified that the park lamps do turn on when jumping the correct headlight switch terminal connectors (TEST 3).
The next step is to check the continuity between pins B2 and R of the headlight switch itself.
If there’s no continuity between this pins, when you test them with headlight switch in it’s ‘park lamps on’ position… then you can confidently conclude that the headlight switch is bad and needs to be replaced.
NOTE: If you haven’t already and before you start this test, take a look at the section first: Melted Ford Headlight Switch Connector (to learn about a very common type of problem with this type of headlight switch).
OK, this is what you need to do:
1 Place your multimeter in Ohms mode and pull the headlight switch knob to the ‘park lamps on’ position.
2 Test for continuity between pins B2 and R. If all is ok, your multimeter should register continuity. This means any resistance value below 5 ohms or less.
3 Push the knob back in to it’s ‘off’ position. Your multimeter should now show NO continuity. This is usually represented on the multimeter’s screen by the letters OL.
CASE 1: The multimeter registered continuity when you pulled the headlight switch knob to the ‘park lamps on’ position. This is the correct and expected test result. This test result also tells you that the park lamps circuit inside the headlight switch is good.
CASE 2: The multimeter DID NOT register continuity when you pulled the headlight switch knob to the ‘park lamps on’ position. Recheck your multimeter connections and retest.
If after double-checking your connections and retesting… the headlight switch still doesn’t show continuity between pins B2 and R, you can confidently assume that the headlight switch is bad and needs to be replaced (even more so if in TEST 3 the park lamps came on when you jumped the headlight switch connector).
Melted Ford Headlight Switch Connector
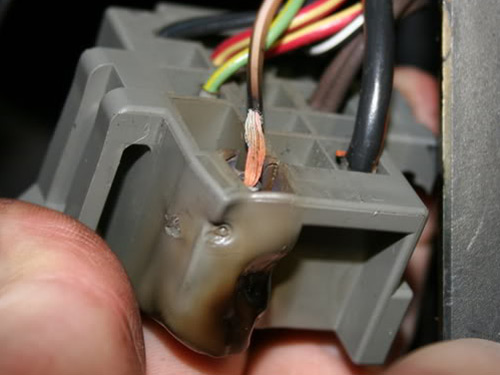
Melted headlight switch connectors (and headlight switches) are a very common problem on Ford vehicle’s equipped with this type of headlight switch causing the headlights or park lamps to stop working.
There’s a very good chance that this is exactly what has happened in your particular Ford vehicle.
So, before you start any of the tests in this tutorial, you’ll need to see if this has happened in your particular case.
If you do find that the headlight switch connector is melted, you’ll need to replace both the headlight switch and the connector.