
Many commercial in-cab winch controls are now available, and I had been looking at a particular model for some time. It had engraved switch panels that looked pretty sweet, but with the location I had selected for the controls, the panel layout would not have been optimal. And I find myself getting cheaper every day.
Recently I had been doing a lot of bodywork on the B2 in preparation for a paint job. The driver side door was fairly well mangled, and the backing hardware for the folding mirror was bent and I couldn’t get the bolts back in. To re-mount the mirror after the bodywork/paint job, I had to modify the backing bracket from inside the door. The easiest way to access the door interior at this height was to cut this access hole.
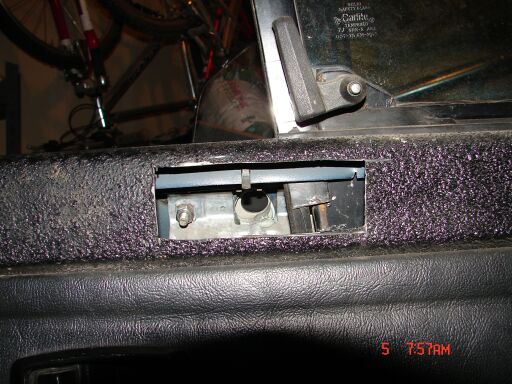
I was going to just put a sheet metal cover over it, but as I was cutting the panel I decided that it would be a good place for the winch controls. Out of passenger reach and at the same exact spot where I normally have my hand for remote winch operation. My only concern is water access, but an examination yielded that after 18 years it looks like it has remained relatively clean and dry.
Parts Needed:
- Double-pole, double-throw (DPDT) momentary toggle switch (Radio Shack cat#: 275-709)
- 12VDC Toggle Switch with Safety Cover (Radio Shack cat#: 275-601)
- LED $1.99 (optional, especially if your power switch is illuminated)
- 16 gauge wire
- Connectors (mostly female and male .250” blade connectors, a few eyelet style at the solenoids – about $8 worth)
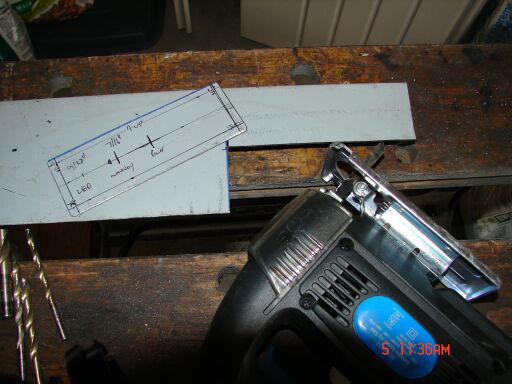
- Metal for panel (old PC housing in my case)
- Miscellaneous (I used a little electrical solder, heat shrink, sheet metal screws, paint, loom, etc.)
With the exception of the DPDT momentary toggle switch, all the above items should be available at a standard auto part or hardware store. My local middle-of-nowhere Radio Shack had several of the momentary DPDT switches in stock, and they can also be ordered from Radioshack.com. Alternatively, two momentary rocker or push-type switches could be used instead of the momentary toggle.
The following applies to my Warn M8000 with the 5-pin controller, although I think it would be identical for a 3-pin controller. My M8000 has a separate, easy to access solenoid pack. I don’t know how easy or difficult it would be to access the solenoid in an integrated winch.
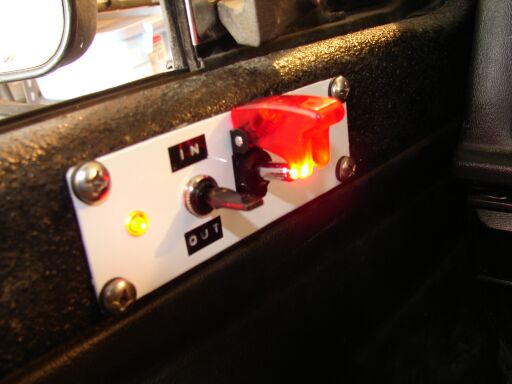
Step 1) First I cut the switch panel with a jigsaw. I used a piece of a scrap desktop PC housing for my metal.
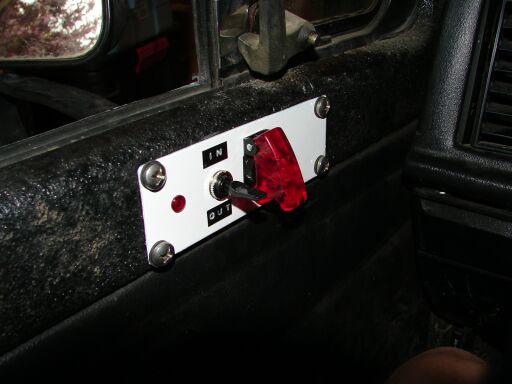
Step 2) I drilled out the holes for the switches and the LED. I didn’t realize that the guarded power switch I had bought was illuminated until I saw the hook up for ground, but I had already drilled the hole out for the LED indicator light. So I decided to use both indicators.
Step 3) I mounted the switches and LED and wired according to the diagram in the above references. I soldered and shrink-wrapped the pigtail splices, but otherwise just used crimp-on female spade connectors. Again, with the guarded power switch that I used, a separate LED indicator wasn’t necessary, but I used it anyway.

Step 4) At the winch end, I made short leads from the “in” wire (my winch = green), “out” wire (my winch = black), and solenoid ground wire (my winch = brown) and routed them to exit the solenoid pack. To avoid confusion with my black battery ground wire, I used white wire to route to the switch for battery out.
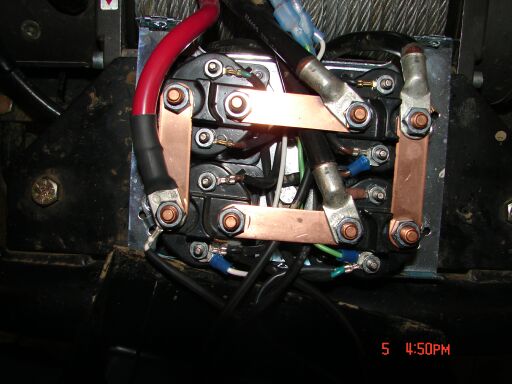
Step 5) The power for the controller I wired straight from the battery (power and ground), although I could have just as easily routed the power from the solenoid pack (where the battery positive cable hooks up to) and to the motor ground (which is directly wired to the battery negative terminal).
Step 6) I used spade disconnects at a couple of points to simplify routing of wires. I used a few feet of split wire loom for presentation purposes here and there.
Step 7) I would have painted the panel black, but I was out of both gloss and semi-gloss black. So I painted it white for now. I might think of more elegant fasteners than the big stainless sheet metal screws. Also, the old school dial-a-labels might get changed out for something a little more professional looking later on.
Activated and ready to winch:
Tech page written by: Bailey, and edited by: rentalguy1
Resource: BroncoII.org (2004-2016)